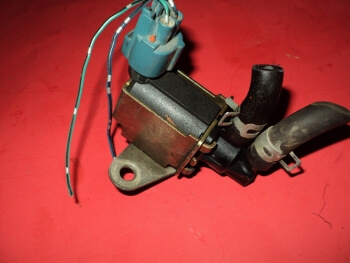
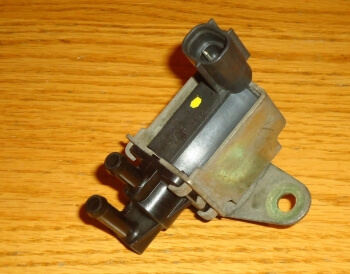
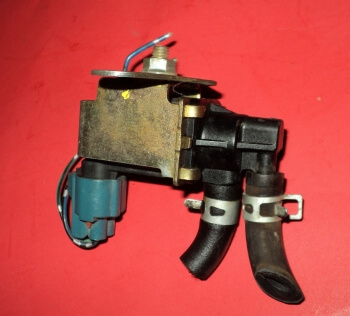
1999-2005 Suzuki Chevrolet Canister Purge Control Solenoid EGR Vacuum Switch Valve
Price list
Still could not find the Part? Contact us @ Find Exact Part in 24 Hours
Specification
| Brand | |
|---|---|
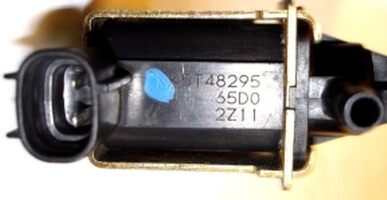
| MPN | K5T48295 |
| Year | 1999, 2000, 2001, 2002, 2003, 2004, 2005 |
| Make | |
| Model | Aerio, Grand Vitara, Tracker, XL-7 |
| Trim | 3 And 5-door Suv, 2-door Convertible, 3 And 5-door Wagon |
| Engine | 1.6 L M16a I4 (Petrol), 2.0 L J20a I4 (Petrol), 2.4 L J24b L4 (Petrol), 2.7 L H27a V6 (Petrol), 3.2 L V6 (Petrol), 1.6 L G16b I4 (Petrol), 2.0 L J20a I4 (Petrol), 2.5 L H25a V6 (Petrol), 2.0 L Rf/rfm I4 (Diesel), 2.0 L Rhw/rhz I4 (Diesel) |
| Placement On Vehicle | Front |
| Fitment Type | Direct Replacement |
| Surface Finish | Cleaned and Tested |
| Warranty | Other |
| Part Number | K5T48295, K5T 48295, 18117-65D00, 91174515 |
| Condition | Used |
Fit In Five Steps
How to replace a Suzuki Chevrolet Canister Purge Solenoid?
1.Materials Needed For Repair
- Boxed end wrench or ratchet wrench
- Flashlight
- Flat blade screwdriver
- Penetrating oil (WD-40 or PB Blaster)
- Replacement canister purge solenoid
- Replacement vent or vacuum hoses (if the ones attached are frayed you should replace)
- Safety equipment (safety glasses)
- Scan tool
2.Secure Vehicle & Locate Canister Purge Valve Solenoid
The canister purge solenoid is connected to a power connection that supplies the device with electricity in order to trigger the solenoid on and off. Because of this, the first thing that should be done before replacing this part is to disconnect the power supply by removing the positive and negative battery cables. Raise the hood and locate the canister purge solenoid. On most vehicles, this component is located on top of the engine, or near the rear of the fuel system. It will have an electrical harness and two vacuum lines attached. One of the vacuum lines runs to the fuel injector rail, while the other is attached to the EVAP canister located near the fuel cell. Locate this component and match it with your replacement part before removing.
3.Remove Old Canister Purge Solenoid
Once you’ve located the correct part, disconnect the electrical harness that is attached to the canister purge solenoid. A good tip that many experienced mechanics know is to mark the location of each vacuum line so that you don’t install them backward. This component is usually secured to a bracket near the fuel injector rail or the firewall with a 10mm sized bolt. Remove the bolt and remove the old canister purge solenoid from the vehicle.
4.Install New Canister Purge Solenoid
Installation of this component is in reverse of the removal. Follow these general guidelines but always refer to the specific instructions in your vehicle service manual. Place new vacuum hoses on the canister purge solenoid (if the old ones are frayed). Install the new canister purge solenoid by securing it to the bracket with the bolt. Install the vacuum lines on the correct male fittings and reinstall the electrical harness. Once the new canister purge solenoid has been secured to your vehicle correctly, check the vacuum lines one last time to verify they were not installed backward. Incorrect installation can result in serious engine damage.
5.Clear Error Codes & Test the Vehicle
Reconnect the battery cables and start the vehicle. Clear any error codes with a scan tool. Start the vehicle and let it warm up to operating temperature. Check the dashboard to verify that the Check Engine Light does not come on. If it does, you should shut the vehicle off and complete a diagnostic scan. After verifying that the Check Engine or other lights are gone, shut the vehicle off and remove the gas cap. This test will verify that the vacuum is working. If you remove the gas cap and there is a tremendous amount of vacuum pressure, re-check the lines you connected to the canister purge solenoid as they may be crossed.


$19.16


Got something to discuss?