Ford Smog Pump Air Bypass Diverter Valve OEM
Price list
Still could not find the Part? Contact us @ Find Exact Part in 24 Hours
Fit In Five Steps
How to replace a Ford Smog Air Diverter Valve?
1.Materials Needed for Repair
- Flat blade screwdriver
- Pair of needle nose pliers
- Other tools for removing engine covers and other components in the way (refer to your service manual for detailed instructions and tools needed)
- Penetrating oil (WD-40 or PB Blaster works best)
- Safety glasses
- Socket and ratchet set (typically 10mm bolts)
2.Secure Vehicle & Locate Diverter Valve
Anytime you work under the hood of the vehicle, it’s recommended to remove the positive and negative battery cables from the terminals. Remove the positive and negative terminals first then proceed. Remove engine covers: On most vehicles, you’ll have to remove the engine cover in order to have access to the air diverter valve. Refer to your vehicle service manual for steps on how to complete this process. In general, you’ll follow these steps noted below:
i) Remove the bolts securing the engine cover the brackets underneath
ii) Remove air filter or air cleaner lines attached to engine cover
iii) Remove electrical harnesses or sensor attachments from engine cover
iv) Remove the cover from the vehicle’s engine compartment
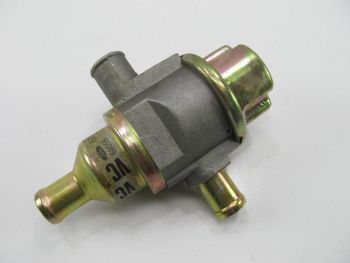
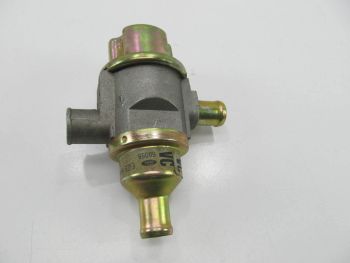
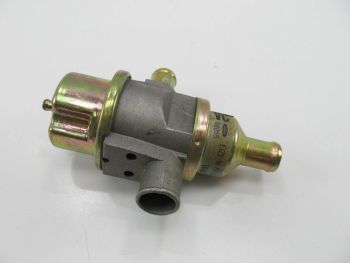
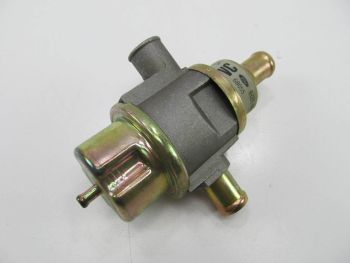
The image above shows what the air diverter valve typically looks like and how it’s connected to the engine. As you can see, there is a main hose with a hose clamp on the left side; which connects to the air pump (smog pump), the vacuum line on the right side (with the 90-degree fitting) and the third line underneath that attaches to the exhaust ports. The unit itself is secured to a bracket that the unit slides inside of and attached to two bolts.
3.Remove the Vacuum Line & Smog Pump Line
Before removing any other components, remove the vacuum line connection first. Sometimes the problem with the air diverter valve is that the vacuum line has been cut, is damaged or not securely fastened to the air diverter valve. Before you remove it, inspect the vacuum line attachment. If it was not secured correctly, reattach it and test-start your car before replacing this part. If the problem still exists, continue to replacing your air diverter valve. Once you’ve removed the vacuum line, the next hose to remove from the air diverter valve is the one attached to the air pump or smog pump. First, using the needle nose pliers, remove the hose clamp secured to the fitting. Slide the hose clamp off the male fitting on the air diverter valve. Once the clamp has been removed, using both hands, grab the air diverter valve with your right hand and start to take the hose off with the left hand. Most of the time this hose is very tight onto the air diverter valve, so you might have to use a flat blade screwdriver to carefully pry the hose off. Another trick is to use a bit of penetrating oil to spray on the inside of that hose to provide some lubrication. You’ll need to add penetrating oil to the inside of the hose for the install, no need to worry about damaging the smog pump hose using that trick.
There are usually two bolts that secure the air diverter valve to the bracket on the engine. Using the right sized socket (typically 10mm), remove the two bolts. On most vehicles, the bolts are secured to the brackets themselves but may be secured with a nut on the other side. Refer to your service manual for exact removal instructions for your vehicle. Once the air diverter valve has been loosened from the bracket, you’ll be able to remove the exhaust manifold connection which is usually at the bottom of the valve.
4.Install the New Air Diverter Valve
The process for installing the new air diverter valve is exactly opposite from the removal noted above. Follow these general steps but refer to your vehicle’s service manual for exact instructions.
- Place new air diverter valve inside the bracket
- Install the exhaust manifold hose onto the bottom of the valve
- Install the air diverter valve onto the bracket & tighten screws
- Install the smog pump hose
- Install the vacuum line connection on the air diverter valve
- Install engine cover and supporting components that you need to remove earlier
- Reconnect battery cables
5.Testing the Repair
Start the engine with the hood open. Look underneath the air diverter valve and check all three lines (the vacuum, smog pump, and exhaust) and make sure they are not leaking. Test the throttle response. Get inside the vehicle and test the throttle response by quickly pressing the gas pedal a few times on and off. Make sure the engine revs up smooth and also revs down smoothly. Take the vehicle for a test drive. It’s best to test drive your vehicle during a 10 to 15-mile test drive. Make sure you test on the highway to verify that the acceleration is good. In most cases, the reason that this part is replaced is that it failed an emissions inspection.


$74.95


Got something to discuss?