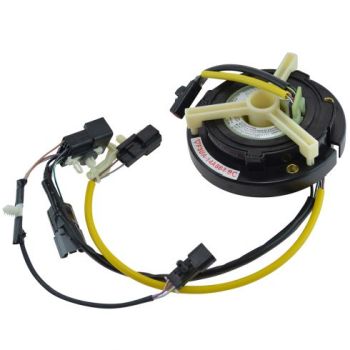
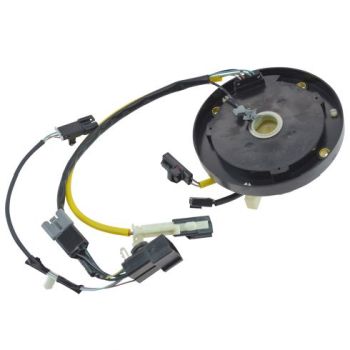

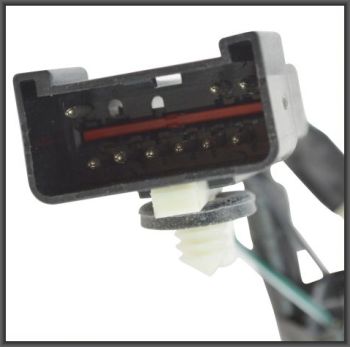
F3UZ14A664B | 1993-1994 Ford E150 E250 E350 Econoline Van Aerostar Air Bag Clockspring
Price list
Still could not find the Part? Contact us @ Find Exact Part in 24 Hours
Specification
| Brand | |
|---|---|
| MPN | F3UZ-14A664-B |
| Year | 1993, 1994 |
| Model | E-150, E-250, E-350, Aerostar |
| Make | |
| Trim | Base, Eddie Bauer, Xl, Xl Plus, Xl Sport, Xlt, Xlt Plus, Xlt Sport |
| Engine | 3.0l V6 – Gas, 4.0l V6 – Gas / 4.9l L6 – Gas, 5.0l V8 – Gas, 5.8l V8 – Gas |
| Placement on Vehicle | Front-Left |
| Fitment Type | Direct Replacement |
| Warranty | 1 Year |
| Part Number | F3UZ14A664B, FDSTC00019, AM-1052605604, F3UZ-14A664-B |
| Condition | New |
Fit In Five Steps
How to replace a Ford E150 Air Bag Clockspring?
1.Remove the Negative Battery Cable
You must start the air bad clock spring removal by disconnecting the negative side of the battery. This will help prevent electrical short circuits while the job is being done. After the battery has been disconnected wait 5 minutes to make sure the airbag safety system has powered down.
2.Remove the Airbag & Steering Wheel
Locate the airbag mounting bolts and remove them to lift the unit from the steering wheel. There will be wire connectors and safety’s attached which will need to be disconnected to completely remove the driver’s side airbag. The steering wheel is held onto the column be a large center nut or bolt. Once the bolt or nut has been undone there will be two different styles of steering wheel removals, the first is to simply lift the wheel from the column while the other requires a puller. A general rule of thumb is if the steering wheel has a bolt it will lift off, and if it is using a nut it will need a puller.
3.Remove the Old Clock Spring
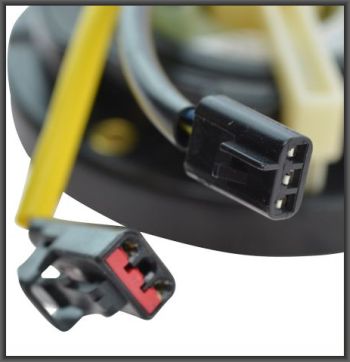
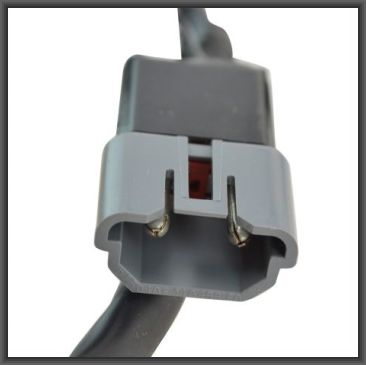
The clock spring sits over the center shaft of the steering column and is held in place by a set of small screws or plastic clips. Once the steering wheel has been removed do not rotate the clock spring upper plate. This particular clock spring is held in with bolts which will be removed further on down in the guide. Take note of the alignment markers of the clock spring and the steering column shaft. These marks must be close when reinstalling the clock spring. Locate the clock spring mounting screws which will be accessed through a series of small holes. The clock spring outer plate may need to be rotated slightly to access the screws. These screws are a number 15 Torx head. Using a Torx head screwdriver or socket to remove the mounting screws by turning them counterclockwise. Use caution as not to drop the screws down inside of the steering column. The top plate may need to be moved slightly in either direction to access all of the mounting screws. Once all mounting bolts have been removed gently grasp the clock spring and pull it from the column shaft. Some designs have a lower wiring harness that will need to be disconnected near the bottom of the column before removal. This particular unit just plugs into a lower connector. Using a small pick or screwdriver to release the plastic retainer clips while pulling the unit outward. This is required on some models. Gently work the clock spring back and forth and outward from the steering column shaft and gently remove. Electrical connectors are attached to the bottom of the airbag clock spring to transfer signals and controls to the steering wheel and airbag. This can also be a wiring harness on some models. Once removed inspect the clock spring for damage. When replacement is required match the new part to the old part, they should match identically. It is sometimes difficult to tell visually if the unit has been damaged because the wires are all internal.
4.Install the New Air Bag Clock Spring
Here is the new steering wheel clock spring assembly that is ready to be installed. Being mindful of the electrical connectors or wiring harness gently lower the new unit into place. Continue by gently pushing the unit into its mounting plate and into the electrical connector below. While inserting the mounting screws gently hand thread them to avoid cross threading. Install all of the screws before tightening them completely. In a cross pattern evenly tighten the mounting screws but do not over tighten because they are in plastic and can strip out.
5.Reinstall Removal Parts & Check for Steering
Complete the job by putting the alignment markers in place and then the steering wheel is ready to be re-installed and you are all set. Reconnect the batteries negative cable and you may need to clear the airbag trouble codes once the job is completed.
BUY HERE


$308.50


Got something to discuss?