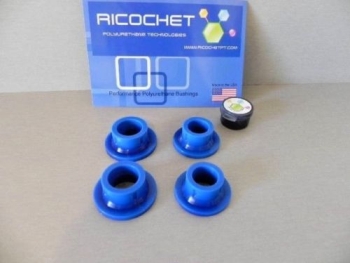
Ricochet RPT L33 | 2004-2005 Toyota RAV4 Steering Rack Bushing Set Polyurethane
Price list
Still could not find the Part? Contact us @ Find Exact Part in 24 Hours
Specification
| Brand | |
|---|---|
| Year | 2004, 2005 |
| Make | |
| Model | Rav4 |
| Trim | Base Sports Utility 4-Door, L SportS Utility 4-Door, Sports Sports Utility 4-Door |
| Engine | 2.4L 2362CC l4 GAS DOHC Naturally Aspirated |
| Placement on Vehicle | Front |
| Fitment Type | Direct Replacement |
| Material | Polyurethane |
| Country/Region of Manufacture | United States |
| Warranty | 2 Year |
| Part Number | RPT L33 |
| Condition | New |
Fit In Five Steps
1.Materials Needed For Repair
-
- Ball-peen hammer
- Boxed end wrench or ratchet wrench
- Flashlight
- Impact wrench/airlines
- Jack and jack stands or hydraulic lift
- Penetrating oil (WD-40 or PB Blaster)
- Replacement steering rack bushing(s) and supporting hardware
- Safety equipment (safety glasses and gloves)
- Steel wool
After the vehicle has been raised and supported on jack stands, the first thing that should be done before replacing this part is to disconnect the power supply. Locate the vehicle’s battery and disconnect the positive and negative battery cables before proceeding.
2.Remove The Lower Belly Pans/Skid Plates
In order to have clear access to the steering rack, you’ll need to remove the lower belly pans (engine covers) and skid plates located underneath the vehicle. On many vehicles, you’ll also have to remove a cross member that runs perpendicular to the engine. Always refer to your service manual for exact instructions on how to complete this step for your individual vehicle.
3.Remove The Driver Side & Passenger Side Cross Member Bushing / Rack Mount And Bushing
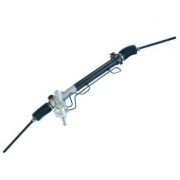
- After you’ve cleared the access to the steering rack and all mounts, the first one you should remove is the driver side bushing and mount. To complete this task, use an impact wrench and an end wrench the same size as the bolt and nut. First, spray all of the steering rack mount bolts with penetrating oil like WD-40 or PB Blaster. Let it soak in for a few minutes. Remove any hydraulic lines or electrical harnesses from the steering rack. Insert the impact wrench (or socket wrench) end on the nut facing towards you, while you place the boxed end wrench end on the bolt behind the mount. Remove the nut with the impact wrench while holding pressure on the end wrench. Once the nut has been removed, use a ball-peen hammer to hit the end of the bolt through the mount. Pull the bolt from the bushing and mount once it is loose. Once the bolt has been removed, pull the steering rack free from the bushing/mount and let it hang until you remove the other mounts and bushings. On most vehicles that are not four-wheel drive, there will be two mounts that hold the steering rack. The one on the left (on the above image) is commonly found on the driver side, while the two bolts on the right of this image are on the passenger side. Removing the passenger side bolts can be tricky if there is a support bar blocking the way.
- In some vehicles, you will have to remove this support sway bar to gain access to the top bolt. Always refer to your vehicle’s service manual for exact instructions on how to remove the passenger side steering rack mounts and bushings. First, remove the top bolt. Using the impact wrench (socket) and the corresponding end wrench to remove the top nut first, then remove the bolt. Second, once the bolt has been removed from the top mount, remove the nut from the bottom bolt, but do not remove the bolt yet. Third, after the nut has been removed, hold the steering rack with your hand while you drive the bolt through the bottom mount. When the bolt goes through, the steering rack may come loose on its own. This is why you need to support it with your hand so it doesn’t fall. Fourth, remove the mounting brackets and place the steering rack on the ground. After the steering rack is loose and moved out of the way, remove the old bushings from the two (or three if you have a center mount) mounts.
4.Clean The Mounting Brackets With Steel Wool
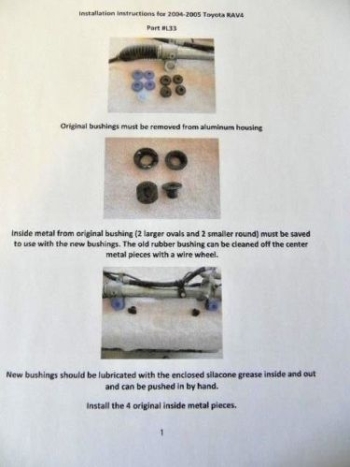
After you’ve removed the old bushings, take some time to clean the inside of the mounts with steel wool. This will ensure that the new bushings will fit easier, and will also secure the steering rack better as it will be free of debris.The image above shows you how the bushing mount should look before you install new bushings on the steering rack.
5.Install The New Bushings & Reinstall Steering Rock, Cover, Skid Plates
- The best way to install new bushings depends on the type of mount. On most vehicles, the driver side mount will be round. The passenger side mount will consist of two brackets with bushings in the middle of them (similar in design to main cap bearings for a connecting rod). Refer to your vehicle service manual for the recommended steps on how to properly install the steering rack bushings for your vehicle. Once the steering rack bushings have been replaced, you need to reattach the steering rack under the vehicle. Install the passenger side mount: Place the mounting bushings on the steering rack and insert the bottom bolt first. Once the bottom bolt is securing the steering rack, insert the top bolt. After both bolts are inserted into the mounts, secure the nuts on both bolts, but DO NOT fully tighten them yet. Install the driver side mount: After the passenger side is secured, install the driver side steering rack mount. Again, insert the bolt and slowly guide the nut onto the bolt. Once both sides are installed and the nuts and bolts are connected, tighten to the manufacturer’s recommended torque settings. This will be found in the service manual. Reconnect any electrical or hydraulic lines attached to the steering rack that you removed in the steps above.
- Install the passenger side mount: Place the mounting bushings on the steering rack and insert the bottom bolt first. Once the bottom bolt is securing the steering rack, insert the top bolt. After both bolts are inserted into the mounts, secure the nuts on both bolts, but DO NOT fully tighten them yet. Install the driver side mount: After the passenger side is secured, install the driver side steering rack mount. Again, insert the bolt and slowly guide the nut onto the bolt. Once both sides are installed and the nuts and bolts are connected, tighten to the manufacturer’s recommended torque settings. This will be found in the service manual. Reconnect any electrical or hydraulic lines attached to the steering rack that you removed in the steps above. Reconnect the positive and negative terminals to the battery. Refill the power steering fluid. Start the engine and steer your vehicle to the left and right multiple times. Lower the vehicle from the lift or jack stands. After you’ve checked the install and double checked the tightness of each bolt, you should take your vehicle on a 10 to 15-minute road test.


$39.00


Got something to discuss?