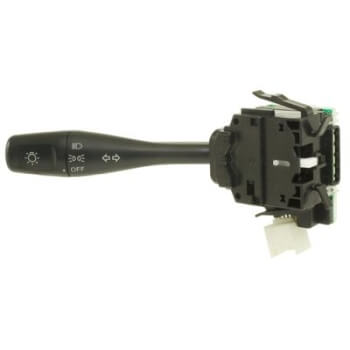

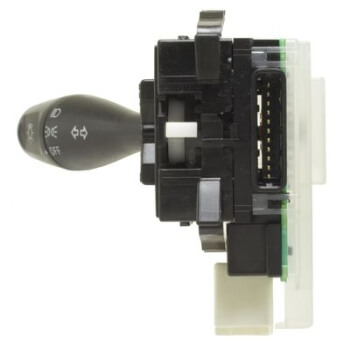
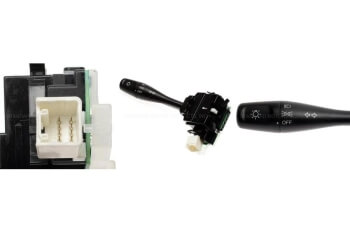
2001-2004 Mitsubishi Lancer Montero Outlander Turn Signal Headlight Dimmer Directional Switch Lever
Price list
Still could not find the Part? Contact us @ Find Exact Part in 24 Hours
Specification
| Brand | |
|---|---|
| MPN | CBS-1104, SW4314 |
| Year | 2001, 2002, 2003, 2004 |
| Make | |
| Model | Lancer, Montero, Outlander |
| Trim | DE Sedan 4-Door, ES Sedan 4-Door, Evolution Sedan 4-Door, Limited Sport Utility 4-door, LS Sedan 4-Door, LS Sport Utility 4-Door, OZ Rally Sedan 4-Door, Ralliart Sedan 4-Door, Sportback Ralliart Wagon 4-Door, Sportback Wagon 4-Door, XLS Premium Sport Utility 4-Door, XLS Sport Utility 4-Door |
| Engine | 2.0L 1999CC 122Cu. In. l4 GAS SOHC Naturally Aspirated, 2.0L 2000CC l4 GAS DOHC Turbocharged, 2.0L 2000CC l4 GAS SOHC Naturally Aspirated, 2.4L 2351CC l4 GAS SOHC Naturally Aspirated, 2.4L 2400CC l4 GAS SOHC Naturally Aspirated, 3.5L 3497CC 215Cu. In. V6 GAS SOHC Naturally Aspirated, 3.8L 3797CC 230Cu. In. V6 GAS SOHC Naturally Aspirated, 3.8L 3828CC 234Cu. In. V6 GAS SOHC Naturally Aspirated |
| Placement on Vehicle | Front |
| Fitment Type | Direct Replacement |
| Material | Plastic |
| Color | Black |
| Warranty | 3 Year |
| Part Number | 201-2175, CBS-1104, R259342, SW4314 |
| Condition | New |
Fit In Five Steps
How to replace a Mitsubishi Lancer Turn Signal Switch Lever?
1.Materials Needed & Diagnosing Problem
- ½ inch drive breaker bar
- Marking Pen
- Safety glasses
- Screwdrivers, Phillips and flat head
- Socket wrench set: ½ inch drive and ¼ drive
- Steering wheel puller
- Torx bits
- Workshop manual
The turn signal lever controls a switch inside the steering column that illuminates and flashes the bulbs inside a vehicle’s turn signals. If these bulbs do not come on, the problem could be the switch assembly or the turn signal lever failing to engage the switch. Signs of a faulty turn signal lever include a wiggling stalk and a turn signal light bulb that blinks intermittently or fails to come on.
2.Removing the Steering Column Covers
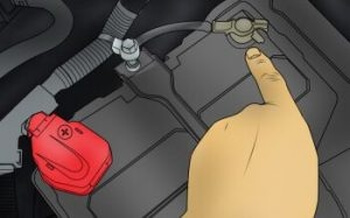
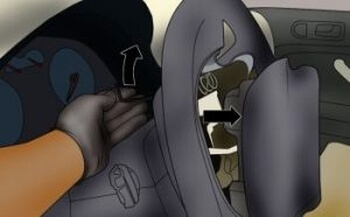
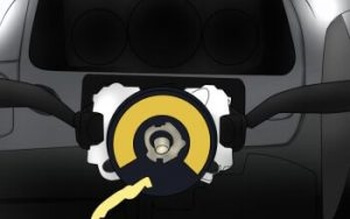
Before attempting to replace the turn signal lever, make sure to turn off the car and remove the key from the ignition. Pop open the hood of the vehicle and disconnect the negative battery terminal. Get back on the driver’s side of the car and leave the door wide open. Wedge the flat end of a spudger into the gap between the upper and lower covers of the steering column. Pry the upper cover up and carefully lift it off the steering wheel.
Remove the screws holding the lower cover down with a Phillips head screwdriver. The number of screws to remove depends on the make and model of the vehicle. After removing the screws, gently rotate the lower cover down and pull it off carefully. Take care not to dislodge the rubber ring around the ignition hole on the other side of the cover. Set both covers down in a safe place.
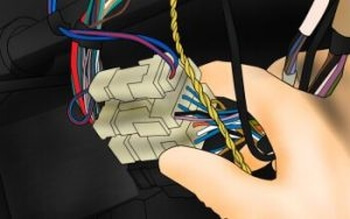
3.Removing the Faulty Turn Signal Lever
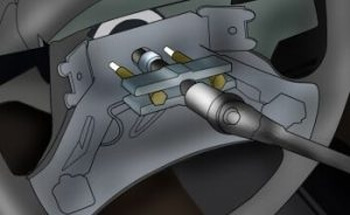
With the covers off, identify the wiring harness under the steering column. Disconnect the harness from the turn signal switch by pulling back the tabs securing its connectors. With a screwdriver, remove the screw securing the switch and lever assembly. Some vehicles use retainer rings rather than screws. If that is the case, simply twist the lever towards the driver’s seat to unlock the retainer ring. Pull the turn signal lever assembly out of the steering column and set it aside.
4.Installing a New Turn Signal Lever
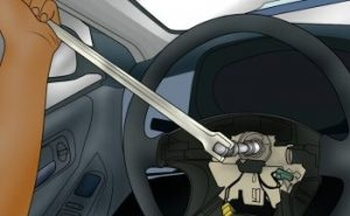
Push in the replacement turn signal lever through the retainer ring. Turn it in the counterclockwise direction to lock the lever in place. For vehicles that use retaining screws, position the lever in the place that the old one occupied. Then, thread in the retaining screw by hand until satisfied that the lever cannot wiggle. Finish tightening the screw with a screwdriver to firmly secure the new turn signal lever.
5.Reassembling the Steering Column & Testing Lever
Slip the wiring harness into its connectors and lock them in with the pull-tabs securing them in place. Replace the lower steering column cover and make sure that the rubber inside the ignition ring is still in place. Slip on the right side of the cover first and align the rubber ring and ignition hole with the ignition switch. Next, lower the upper steering cover in place and gently push it in until it clicks and connects to the lower cover.
After installing the new turn signal lever, it is important to ensure it performs according to expectations and fixes the problems with the old lever. Before testing the new turn signal lever, first, reconnect the negative battery cable, and then start the car. Flip the lever up and down to activate the right and left turn signal lights. Take the car out on a road test to confirm that the lever works under normal driving conditions.


$167.99 $89.98


Got something to discuss?