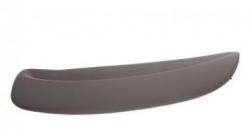
1993-1997 Toyota Corolla OEM Interior Rear Roof Headlining Trim Sub Assembly
Price list
Still could not find the Part? Contact us @ Find Exact Part in 24 Hours
Specification
| Brand | |
|---|---|
| MPN | 63305-12140-P0, 63305-12140-W3 |
| Year | 1993, 1994, 1995, 1996, 1997 |
| Make | |
| Model | Corolla |
| Trim | Sedan 4-door |
| Engine | 4 CYL 1.6 L GAS, 4 CYL 1.8 L GAS |
| Placement on Vehicle | Front |
| Fitment Type | Direct Replacement |
| Warranty | 1 Year |
| Part Number | 63305-12140-P0, 63305-12140-W3, 6330512140E0 |
| Condition | New |
Fit In Five Steps
How to replace a Toyota Corolla Rear Roof Headlining Trim Sub Assembly?
1.Gather the Correct Materials & Remove Anything Securing the Headliner
Fabric (make sure you have a bit more than you need), Hobby knife/X-acto knife, Panel popper tool (optional, but makes the job easier), Screwdriver(s), Sound-deadening foam/heat-blocker (optional), Spray adhesive, and a Wire brush. Unscrew, unbolt, or unclip anything that gets in the way of removing the headliner board or holds the headliner board to the roof. This includes Sun visors, Rearview mirror, Clothes hangers, Side handles, Dome lights, Seatbelt covers, and Speakers.
2.Take Out the Headliner & Examine Soundproofing Foam
Once you’ve removed everything that holds the headliner board to the roof, make sure it is completely loose and take it out. Be very careful while maneuvering the headliner board so you don’t damage it. While the roof is exposed, take time to look at the condition of the soundproofing foam to see whether or not it needs reinforcement or replacement.
3.Scrape Off Flaky Styrofoam Material & Fabric Lay
Now that you’ve removed the headboard, lay it on a flat work surface. You’ll notice that it has dried Styrofoam material that flakes off. Take a wire brush or lightweight sandpaper and scrape it all off. If any of the corners were torn, you can use industrial strength glue to fix it. Repeat more than once for optimum cleanliness. Now that the headliner board is clean, take the fabric and lay it on the board to size it.
4.Glue the Fabric to the Board
Lay the cut fabric over the headliner board in the position you want it glued. Fold half the fabric back to expose half the headliner board. Spray the board with adhesive and smooth the fabric over it, pulling it taut so there are no wrinkles. Also, be sure to follow the contour as best you can, working it with your palms and fingertips. Repeat for the other half. Turn the headliner board over and fix the remaining material to the board.
5.Cut Guide Holes & Reinstall the Headliner
Since the fabric is covering up all the holes you need to screw into, use the hobby knife to cut guide holes. Carefully fit the headliner board back into the vehicle and refit the accessories. Patience is key here.
BUY HERE

$42.58


Got something to discuss?