Dodge Dakota Digital Universal Diesel Tachometer Adapter Alternator Interface
Price list
Still could not find the Part? Contact us @ Find Exact Part in 24 Hours
Specification
| Brand | |
|---|---|
| Make | |
| Model | Dakota |
| Trim | All |
| Engine | All |
| Placement on Vehicle | Front, Rear |
| Fitment Type | Direct Replacement |
| Warranty | Yes |
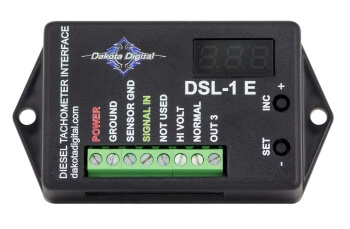
| Part Number | DSL-1E |
| Condition | New |
Fit In Five Steps
How to replace a Dodge Dakota Tachometer?
1.Locate the Output Wire from your Distributor
Depending on your engine, there may be a constant-flow wire and a pulse wire to the tach, as well as the additional wires for the ignition, lights, and other components. It’s important to make sure you’ve got the correct wire for the tachometer, which means you might need to use a multimeter with a tach setting to test the wires correctly, and consult the shop manual for your engine.
- It’s also important to note that some new tachometers are incompatible with solid-core spark plug wires and can be dangerous to connect without following the proper installation instructions for the tach.
2.Test the connection
Before you mount it in the steering column, it’s a good idea to hook up the wiring and test it out while you rev the engine, to make sure it works. You don’t want to go drilling holes in your steering column before you’re sure you’ve got the wiring figured out. After you hook it up to the proper wires from the distributor and ground it correctly, it should give you an accurate reading of your RPMs as you rev the engine.
- Ground the tachometer. Attach the tachometer ground wire to an engine ground of the car. This need not be directly on the battery. Much of the car frame is grounded to the battery by sturdy wires. Trace those wires to find a suitable attachment point.
- Attach the tachometer pickup wire. The tachometer wire must be fed through a grommet in the passenger compartment to reach the engine compartment. This attachment point will vary from engine to engine.
3.Choose a Mounting Location for the Tachometer
Most cars won’t have an in-dash mounting location available, so it’s usually best to mount your tach on the steering column.
- Drill holes in the steering column and use the mounting bracket supplied with the tachometer, or rig your own. Directions for mounting typically are provided with new tachometers, as well as any necessary pieces.
- Bracket mount the tachometer on the steering column. Fabricate or find a secure mounting bracket that will support the tachometer mounting points. Attach the bracket to the steering column. A simple U bracket would suffice for this.
4.Install the Tachometer
Apply power to the tachometer by attaching the power input wire of the tachometer to the 12-volt dashboard lighting supply of the car.
- Provide power to the tachometer backlighting. Locate the 12-volt switched dash lighting supply for the dashboard on the car fuse box. Attach the tachometer backlighting wire.
5.Install a Grommet in the Firewall
It’s a good idea to install a rubber grommet where the wire(s) pass through the firewall as part of your installation. If the wires rub up against the bare metal, it can cause a fire hazard or at least a short. It’s best to be on the safe side and work a grommet in, which will only cost a few dollars and take a few minutes at the most. This light will remind you that it is recommended to change gears at the current RPM. Not all tachometers have the shift light feature. If your chosen tachometer does, follow the installation instructions to properly set the shift light. The shift light cannot be set if the engine is running.
BUY HERE


$66.45


Got something to discuss?