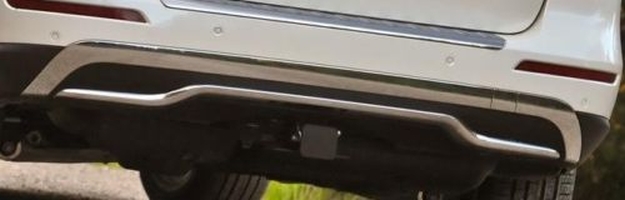
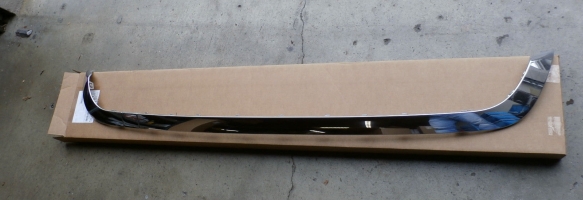
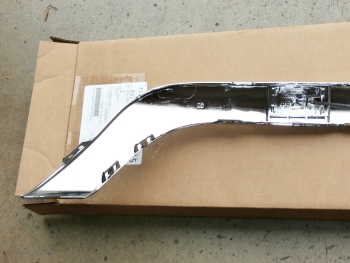
1668852374 | 2012-2015 Mercedes-Benz ML-Class GL-Class Rear Bumper Trim Lower Molding
Price list
Still could not find the Part? Contact us @ Find Exact Part in 24 Hours
Specification
| Brand | |
|---|---|
| MPN | 1668852274 |
| Year | 2012, 2013, 2014, 2015, 2016, 2017 |
| Make | |
| Model | GL350, GL450, GL550, GLS550, ML250, ML350, ML400, ML550 |
| Trim | 4Matic Sport Utility 4-Door, Base Sport Utility 4-Door, Bluetec 4Matic Sport Utility 4-Door |
| Engine | 2.1L 2143CC 131Cu. In. l4 DIESEL DOHC Turbocharged, 3.0L 2987CC V6 DIESEL DOHC Turbocharged, 3.0L 2996CC V6 GAS DOHC Turbocharged, 3.5L 3498CC 213Cu. In. V6 GAS DOHC Naturally Aspirated, 3.5L 3498CC V6 FLEX DOHC Naturally Aspirated, 3.5L 3498CC V6 GAS DOHC Naturally Aspirated, 4.6L 4663CC V8 GAS DOHC Turbocharged |
| Placement On Vehicle | Rear Upper |
| Fitment Type | Direct Replacement |
| Surface Finish | Chrome |
| Warranty | 2 Year |
| Part Number | 1668852274, 1668851174 |
| Condition | New |
Fit In Five Steps
How to replace a Mercedes-Benz ML-Class Rear Bumper?
1.Work in the Boot
Open your car boot and locate the plastic trim that covers the bolts that hold your bumper onto the car. First, unscrew the small screws that hold the trim in place, then you’ll need to pry it off carefully avoiding damage with a standard flat head screwdriver in order to expose the bolts. It’s then a simple case of taking off the bolts with a spanner or wrench.
2.Under the Car
You will now need to disconnect the remaining bolts from the inside of your rear wheel arches. These should be easy to find and remove with an even number of screws located in each wheel arch. Then slide under your car and use your screwdriver to pop out any plastic rivets along the bottom of the rear of your vehicle that hold the bumper in position. When you’ve completed this final task it should be easy to pull the bumper off the car. Make sure that you place all screws and fixings somewhere safe as you’ll need them later.
3.Find a Friend & Remove Old Rear Bumper
For this next stage, you’ll need an assistant or friend to help you out. Open the boot of your car and get your helper to hold the bumper in place against the rear of the car. This may take a little time as you have to get the bolt holes described in step one to line up with the holes in the bumper. Once you have achieved this use your spanner or wrench to reattach the bumper. Then carefully reattach the plastic trim and screw it into place.
4.Final Steps for Install New Rear Bumper
Now go round the car bumper and put the screws back in place under the wheel arches. Next, use the plastic rivets to reattach the bumper to the underside of the rear of the car holding it firmly in place to the bodywork. As a final step, you can go around the car pushing down on the bumper to check that all the screws and fixings are tight enough to hold it in place. If there is any movement in the bumper whatsoever, locate the nearest screws and bolts and tighten them further.
5.Check for Testdrive
Once the bumper is on securely you can reattach the wheel wells and tires and take your car off the jack stands. Once you have replaced your car’s bumper there’s nothing more to do other than to enjoy safe driving around knowing that the occasional bump or prang isn’t going to affect your bodywork. It’s that easy. All you have to do now is to try to stop other motorists from driving into the back of you.


$149.90


Got something to discuss?